


Winter is Nature’s most formidable force, stopping everything in its tracks, casting a spell. In the deep freeze of February, as the forest lay dormant, I set off on an eight-month odyssey to thru-hike the 2,193-mile Appalachian Trail.
Through four seasons, I walked rugged and unforgiving terrain — with love in my heart and my home on my back.
Experiencing each season on trail was humbling. It challenged me, and my gear. I knew I had to hike my hike — prepared, not scared.
Months of research and shakedowns helped, and, yet, winter brought challenges and considerations that summer couldn’t compete with: sleeping with my filter at night to prevent it from freezing; carrying a much heavier pack; and an endless cycle of putting layers on and removing them.
While hiking, I learned what worked and what didn’t, adapting to each season and rotating my gear accordingly. Here’s how my kit changed in winter versus summer, and why.
My Big Four: Pack, Shelter, Sleeping Pad, Quilt

The Big Four are the core essentials for thru-hikers, vital to survival in the wilderness. They consist of your shelter, pack, quilt/ sleeping bag, and sleeping pad. (For those with keyboard out, ready to quibble in the comment section, yes, some hikers instead refer to this as The Big Three, grouping sleep system into a single category.) These are the heaviest items that a thru-hiker will carry. I aimed to keep my Big Four under 10 pounds, for the sake of my health.
Winter Setup
Shelter: Big Agnes Cooper Spur HV UL 2 — 3lbs. 2oz
Pack: Six Moons Swift X — 37oz
Pad: Thermarest XTherm — 19.5oz
Quilt: Enlightened Equipment Revelation Quilt (10 degree) — 22.9oz
Summer Setup
Shelter: Six Moons Skyscape Trekker Tent — 28oz / Zpacks Duplex — 19oz
Pack: Six Moons Swift X — 37oz
Pad: Sea to Summit Women’s Comfort Light Insulated Air — 1lb. 5oz
Sleeping Bag: Sea To Summit Women’s Flame Ultralight Down Sleeping Bag — 12.3oz
Bottom Line
My winter Big Four setup was a beast. The Swift X is an absolutely stellar pack, holding 45L, complete with a chest harness and hip belt that is abundant with pockets. I was originally debating taking my ULA Circuit pack on the AT, but found that, as someone living with chronic back pain, the vest harness helped transfer the weight to my core, releasing pressure from my shoulders. I plan on using the Swift X for my upcoming hikes of the CDT and PCT, because it's that dang good!

Enlightened Equipment makes nearly perfect quilts, as soft as sleeping on a cloud. I love my quilt because it packs down easily and is fully convertible from quilt to bag. The only downside is a drafty footbox. I tackled this issue by plugging the opening with extra clothes (if I had any).
I found that the XTherm Sleeping Pad, with a 6.9 R-value, coupled with my EE Revelation quilt, was a match made in heaven. The XTherm, at 2.5 inches thick, made sleeping easy from the beginning of my hike. It was durable, extremely warm and the best bang for the buck, plus without the crinkling sound of a Lay’s potato chip bag.
What Gear Changed Between Winter and Summer
Shelter

One of the most common tents used on the Appalachian Trail, the Big Agnes Cooper Spur is a 3-pound, durable, double-walled, free-standing tent. I nicknamed it “my baby” and it worked perfectly in the cold seasons. It can handle a little bit of snow and traps heat well. However, this comes at the cost of condensation. Even with a vent at the top of the tent, I was forced to leave one of the double doors open. During rainstorms, I also had issues with leakage, even when flawlessly staked. But the thing I most disliked was the weight.
Going into the summer months, I switched tents. My sponsor, Six Moon Designs, supplied me with a Skyscape Trekker Tent. I loved the spaciousness of this single-person tent, but the learning curve was steep. Setting it up in a timely manner proved difficult, especially in torrential rains. (In one instance, it flooded.)

Eventually, I settled on the Zpacks Duplex, and found my other half. I love the Duplex. It’s spacious, lightweight, easy to set up, and has incredible stability in high winds and torrential rain. The only con is that I can be rough with my gear, and ended up poking a hole in it the first time I used it.
Sleeping Pad

To minimize weight, I switched out the XTherm to a Sea to Summit Women’s Comfort Light Insulated Air; and instantly regretted it. Rated at 48 degrees with a 3.7 R-value, I found myself shivering constantly, as summer temperatures fluctuate often in New England.
Sleeping Bag
Sending my beloved EE quilt home was bittersweet; it served me well until I got to Pennsylvania in mid-July. Quilts have always appealed to me because I can just stick my foot out the side for ventilation. With a sleeping bag, I soon noticed I wasn’t a fan of being trapped in a literal heatbox. Waking up wet is never ideal, and a perfect opportunity for hypothermia. While I loved that the sleeping bag had a hood and was much lighter, I opted for an EE synthetic summer quilt for my upcoming thru-hike.
Other Small But Mighty Sleeping Gear

A good night’s rest is dependent on a few other gear items beyond The Big Four. Sleeping liners, pillows, booties and hoods help manage temperatures that rise and fall like tides in the sea.
Winter Setup
Liner: Sea to Summit Reactor Extreme Liner — 14oz
Pillow: Sea to Summit Aeros Down Pillow — 2.5oz
Booties: Goosefeet Gear Down Socks — 2oz per pair
Hood: Goosefeet Gear Down Balaclava (Double-Filled) — 2.4oz
Summer Setup
Liner: Sea to Summit Reactor Thermolite Liner 8.7oz
Bottom Line
Liners are a great way to wick moisture, keep your sleeping bag clean, and add warmth! The Sea to Summit Reactor liner was comforting to the skin and felt as soft as velvet. It’s debatable whether this liner adds 25 degrees. To me, it felt more like it added 10 degrees.
Using my clothes in a stuff sack did not appeal to me as sufficient support for my neck, and I opted in for a pillow!
In the beginning of my hike I debated bringing booties and a balaclava (quilts do not have hoods). It soon became clear I made the right choice by bringing them. Having cold feet at night is a big no-no. I figured with a drafty footbox that the booties would suffice, and they did with the addition of air-activated hand warmers.
What Changed Between Winter and Summer
Liners
In the winter it makes sense to have a heavier liner, whereas in summer a liner can be slept in on its own, without a quilt/ sleeping bag. I opted for a 10 degree liner during the summer months, and slept solely in it on the hottest nights.
Baselayers/ Clothing
Baselayers are the layers of clothing closest to the skin. They keep a hiker warm or cool, depending on the season. The best baselayers are synthetic, wool and alpaca. The latter is especially good for those who are sensitive to wool like myself.
Thermal clothing is versatile and can be adapted depending on climate, activities and conditions. I chose to go with Arc’teryx and Icebreaker baselayers because they were the least irritating to my skin and are higher quality articles of clothing. Generally, I carried two pairs of clothes, one for hiking and the other for camp.
Winter Setup
Baselayer Bottoms: Arc’teyrx Rho AR Bottoms 7.4oz
Baselayer Camp Bottoms: Women’s Bodyfitzone Merino 260 Thermal Leggings 7.4oz
Pants: Arc’teyrx Sigma FL Pant Women’s 10.6oz
Baselayer Top: Icebreaker Merino 175 Oasis Long Sleeve Scoop Thermal Top 5.29oz
Mid-layer: Arc’teyrx Rho AR Half-zip 6.5oz
Puffy: Arc’teyrx Throrium Hoody 14.8oz
Summer Setup
Shorts: Arc'teryx Alroy Short’s Women’s — 5.8oz
Shirt: Arc'teryx Taema Crew Neck — weight unknown
Dress: Purple Rain Adventure Dress — weight unknown
Bottom Line
I carried extra baselayers for the winter months, nearly 3 ½ pounds worth! But given the conditions, especially in the White Mountains, I had no choice. Better safe than dead! Arc'teryx has amazing, quality synthetic baselayers, and although very pricey, they deliver. I found the half-zip baselayer pants and hiking pants to be a sweet spot for me.
I tried many brands of wool — Smartwool, Ibex and others — and my skin felt itchy and irritated. Luckily, wool clothing made by Icebreaker feels much softer, and I haven’t looked back.
What Changed Between Winter and Summer

During the summer, I did a complete swap of my baselayers, and opted for a hiking dress and one pair of clothes. My pack felt like a feather, allowing me to fly down the trail. I didn’t need to layer much in the summer, and if I felt cold, I threw on my puffy or rain gear.
Rain Gear
Staying dry and retaining heat during a rainstorm is ideal. When wet, the body can experience hypothermia. It rains A LOT on the Appalachian Trail and I wanted to go in fully-loaded with the best of the best.
Winter/ Summer Setup
Rain Coat: Montbell Women’s Versatile — 5.8oz
Rain Pants: Zpacks Women’s Ultralight Rain Pants — 2.6oz
Umbrella: Six Moon Designs Silver Shadow Carbon Umbrella — 6.8oz
Bottom Line
My lightweight rain gear setup was flawless. Rain gear is not necessarily designed to keep you dry, but to keep you warm. Adding an umbrella is a game-changer. When my raincoat became an oven, I simply put on my rain pants and sports bra, and then attached my umbrella to my pack, using Six Moon Designs hands-free system.
The only issue with umbrellas is that they cannot be used in high winds. I also accidentally snagged my first umbrella on a tree, tearing it and rendering it useless.
The Montbell Versatile is a gem that you can easily carry in your pocket. Complete with a Gore-Tex infinium wind-stopper membrane and pit zips, this raincoat has superb ventilation and breathability.

I coupled my coat with rain pants by Zpacks, which thoroughly impressed me. For an item so light, I questioned its durability and waterproofing. I was pleasantly surprised that when it rained, my legs stayed dry. I love love LOVE these pants and still wear them around town as they are just so comfortable!
Cooking/ Food Storage Setup
Cooking on trail is a blessing and a curse. Some choose to cold soak while others bring fuel and a stove for warm meals. Cooking can be time-consuming and requires constant vigilance, whereas cold-soaking food in a Talenti or similar jar is nearly effortless.
In winter, I recommend a warm meal right before bed to give the body the energy it needs to supply heat throughout the night. In summer, it’s more about a hiker’s preference. During my entire time on the AT, I choose to cook my breakfast and dinners and eat a cold lunch.
Winter/ Summer Setup
Pot: Toaks 750ml Titanium Pot — 3.6oz
Stove: MSR Pocket Rocket — 2.6oz
Spoon: Toaks Long Spoon — 3.6oz
Food Storage: Ursack Major XL — 8.8oz / Opsack — unknown
Bottom Line

I carried the same cooking set in both winter and summer. I loved every piece in it, even if I did have to double back miles a few times because I left my MSR Pocket Rocket behind. At 2.6 ounces, this stove fits in the palm of your hand.
Food and bear safety go together like DNA; you cannot have one without the other. Thankfully, on the AT a bear canister is not required and I went with a Ursack. What I liked about the Ursack, lined with a smell-proof Opsak, is that I could simply tie it around trees at night. The biggest downside was that, when it rained, the Ursack absorbed water like a sponge, forcing me to carry that heavy water weight the next day. That said, I’d take the weight of a wet Ursack anyday over throwing a rock, pleading mercilessly to the Nature Gods that the thin line it’s attached to catches a sturdy branch.
Hydration
Hydrating is hard in the winter due to a lack of thirst, but drinking adequate water is needed to maintain the body’s vital functions and get you through the trail. Every living thing depends on water. I found that adding flavored mixers to my water in winter helped me stay hydrated; while in the summer I drink like a camel.
Winter Setup
Water Filter: Sawyer Squeeze — 3oz
Bladder: Cnoc Vecto Bag 2L — 2.6oz
Summer Setup
Water Filter: Katadyn BeFree — 1.2oz
Bottom Line
Either way the cookie crumbles, these are both efficient, lightweight, simple-to-use water filters that produce the same results, safe drinking water; it's just a matter of speed, longevity and preference.
What Changed Between Winter and Summer

Keep calm and stay hydrated, no matter the season. I started the AT with the Sawyer Squeeze, and also brought the coupler that attaches the filter to a Cnoc Vecto bladder for hands-free, gravity filtration. I found this system to be the most efficient.
I heard about the Katadyn filter on trail and was curious to try it, as the word was that it filters water twice as fast as the Sawyer. It also comes in the form of a water bottle, allowing you to drink right from the filter.
The Katadyn’s filtration process is quite simple and fast, but it comes at the cost of not being able to attach to the Cnoc Vecto bag. For future thru-hikes, I will be staying with the Sawyer and Cnoc Vecto gravity filter system, but the Katadyn is a great alternative; one that shaves a few ounces.
Closing Thoughts

On the Appalachian Trail, Nature demanded that I adapt with the conditions, and I listened. Each gear change brought me confidence and stability throughout my hike.
Winter taught me that it is better to go slow and heavy instead of light and fast. Skimping on gear because of weight can be the difference of life or death during single digit temperatures.
Summer taught me how to hydrate and take breaks when the sun was at its cruelest.
Adapting is the key to thru-hiking; you live, and you learn, and you find out what gear works for you.
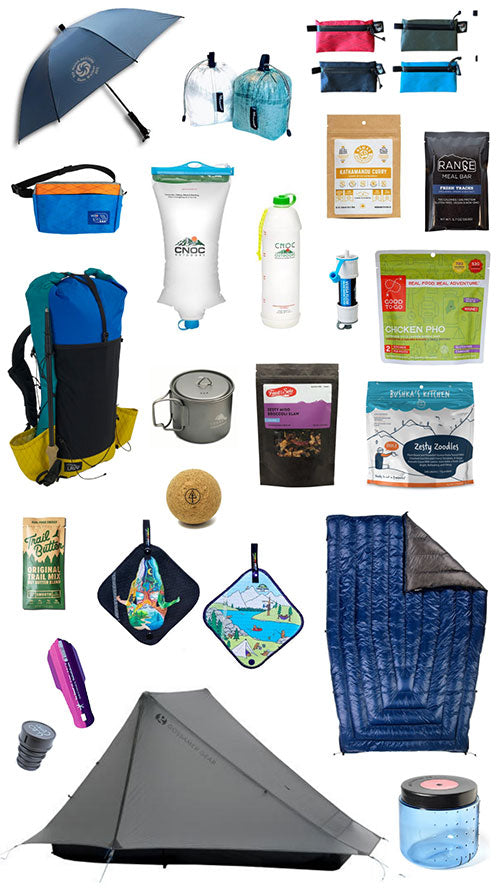
Other Gear Carried the Entire Trail, Both Summer and Winter!
Poop Tool: The Deuce Trowel — 0.6oz
Urine Device: PStyle — 0.8oz
Camera: GoPro 9 — 156 grams
Headlamp: Princeton Tec Remix Headlamp — 2.25oz
Safety Device: Garmin In-Reach Mini — 3.5oz
Stuff Sack: Sea to Summit Lightweight sil 13L — 1.4oz
Weapons: Folding Knife — 2.3oz
Personal Protection: Mace — unknown
Foam Pad: Gossamer Gear Thinlight Foam Pad — 2oz
E-Reader: Kindle Paperwhite 6.4oz
Socks: Darn Tough x3 — unknown


2 comments
Kim Kremer
Thanks for the comparison between the seasons. I’d never thought of that — I tend to use the same gear regardless of the season, just adding more warm stuff when the weather is cooler. If certain things break in my favor, I will be spending July hiking the PCT through Oregon, and I suspect that’ll require some slightly different gear. (I’m already planning to buy a 10°F quilt as I anticipate my 25°F quilt won’t quite be warm enough.) This post has given me some stuff to ponder!
Esther C.
Good article and recommendations-thanks!