How many little holes does your quilt or sleeping bag have? How about your puffy? No shame here, but have you ever replaced a piece of outdoor clothing with a minor tear simply because you didn’t know how to sew it up? Let’s change that. Sewing is quite simple, and I'm going to use myself (along with a Sewing Kit from Gear Aid) as an example since as I begin to write this, I don’t yet know how to sew. After a few thru-hikes, some regular wear and tear, and moments of carelessness with my outdoor gear, I certainly have items that can use a little repair love.
The journey to less waste and more gear restoration starts today. One fellow thru-hiker on the PCT commented, regarding some sewn-up shorts of his, “Once you repair a piece of gear, it finally feels like it’s yours.” Let's start making our gear our own...
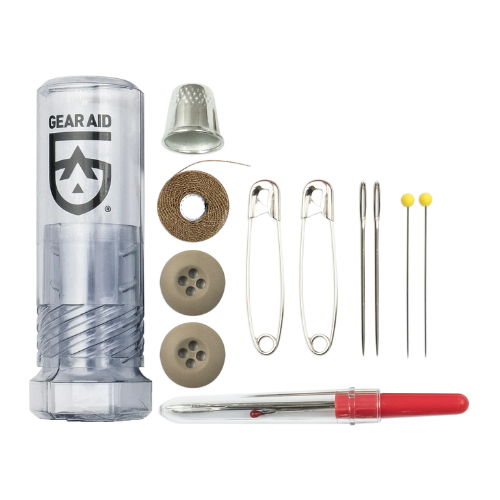
What’s in the Sewing Kit?

Your ultralight Gear Aid Sewing Kit will comes with a thimble, a seam ripper, thread (#69 Coyote), buttons (#30 Coyote), two sewing needles (#18 and #16), three straight pins, and two safety pins.
What Do Those Numbers Mean?
- For the #69 coyote thread, the #69 refers to the thread’s size. It’s an appropriate size for outdoor gear such as backpacks, tents, etc. “Coyote” is simply the color of this bonded nylon sewing thread! Perfectly sturdy for our purposes.
- #30 for buttons again refers to their size. In layman’s terms, they’re two standard, coyote-colored buttons with four holes each.
- When it comes to needles, the bigger the number, the bigger the needle. #18 and #16 are on the larger side, which is important for the tougher fabric we will often need to repair.
What About Those Other Tools?
- You wear a thimble on your thumb or finger to keep you from pricking yourself as you sew. Frankly, I did not really use mine. This might be a part of the kit that our hyper-UL hikers leave at home. Just as hikers earn their foot calluses, sewing pros earn calluses on their fingers.
- A seam ripper is to rip up threads and seams. You generally won’t need it for repairs, but I could see it being used to fix your sewing mistakes. If you’re thru-hiking for instance, you may not have scissors of any kind and this may be a good lightweight replacement. That said, you could probably do the same job with a small knife, it will just be a little slower and more tedious.
- Straight pins are the ones with the little yellow spheres on one end. You might have seen your mother’s tomato pincushion absolutely chock full of these as a child, I know I did. They’re useful for holding two pieces of fabric together as you sew.
On the Usefulness of Safety Pins
Before I set out to do any actual sewing, one of the safety pins from my kit got put to good use. A friend had a jacket that wouldn’t zip up quite right, but by pinning the bottom together, we were able to restore it to good working order. They are so light and have such specific utility that I would absolutely advocate for having one or two on hand. They could be life-savers if you have a gear mishap in the backcountry.
Gear Repair #1: The Scarf

On a hike recently, my partner and I ran into a guy hiking with at least nine dogs. They were all very friendly, and when I bent down to pet one, he immediately grabbed my scarf in his mouth and started an unexpected tug of war game. While it was an adorable interaction, I did end up with a hole through the nice scarf that my partner had gotten me. Like most quests for knowledge these days, mine started with Google. I looked up some sewing tutorials, and just started clumsily going for it. Here’s a step-by-step process, as easy to understand as I can make it.
1. Thread the Needle

It's just as it sounds, and it’s not too tough with some coordination and practice. To make it easier to get the thread into the eye of the needle, you can wet your thumb and forefinger to run across the end of the thread to contain any loose frays. Cutting the thread after wetting it and/or cutting it at an angle can also help this process.
2. Trim and Knot the Thread

Cut enough thread from the spool to sew up your hole or tear. One tip I saw online said approximately 2.5 times the length of your tear. You don’t want it too short, but you don’t want it too long either, or it’ll get tangled as you're sewing.
On one end of the thread, tie the simplest knot you know. Also called an “overhand knot,” it’s just making a loop and putting the end of the thread through that loop. You probably want to do it twice in the same spot, especially for fabric that isn’t especially dense, making the knot just big enough to not slip through the fabric.
It’s worth noting that I did this wrong at first. I tied the thread to the needle itself, and the seam ripper came in handy. Just keep trying!
3. Go Crazy and Make a Frankenstein Stitch

Here’s where my inexperience showed itself. With the thread tied to the needle itself, I just kind of set about pulling the knotted thread through the relatively loose-knit fabric of my scarf. I pushed it through the edges of the fabric across the hole, tied a bunch of knots in the thread by making loops and passing the needle through, and pulled it together. It’s not pretty, but it seems functional! At the very least, it should keep the hole in my scarf from expanding further. An experienced sewist later confirmed that as long as you're capturing all the loose ends of the scarf, it will ensure it will not continue to unravel. Frankenstein stitches are totally okay and can certainly give a certain "look" as a final result.
Gear Repair #2: The Pants Pocket

I would call my experience with the scarf a tentative success. However, it was clear I was missing some vital information. I had just found a hole in the pocket of my pants, and I wanted to sew it up. Google is helpful, but there are better resources out there, and I decided to utilize the best possible resource available to me...
1. Call Mom
Over a video call, my mom guided me through this very simple stitch. She talked me through cutting the right length of thread, 12-18 inches usually, tying the knot in the thread itself, and more. Most of the advice in this article is really just her advice.
2. Turn the Garment Inside Out

With my scarf, this wasn’t much of a worry, but just to hide the knot and the messy parts of our repair job, we turned the pocket inside out. We looked at it, and my pocket’s hole was not quite on the seam but right next to it. If it had been a rip in the seam itself, we could have simply re-sewn the seam, but in this case, we’ll just sew up the hole separately from the seam.
3. Do It Right This Time

So, we’ve turned the pocket inside out. We’ve threaded the needle, trimmed the thread, and knotted one end of the thread. Now, hold the two parts of the torn fabric together and, on one end of the tear, push the needle through both pieces of fabric to begin rejoining them. Pull the thread gently, all the way through, so the knot stops when it meets your fabric. As your knot holds your thread in place, repeat this across the length of your tear.
4. Finish With Another Knot

Now, our original knot on the end of our thread is holding our stitch in place. We’ve sewn up the tear, and now we need to finish it off and hold all the stitches in place. If you want to reinforce the repair a bit, just stitch it exactly the same back in the other direction, then finish with this final knot that I’m about to explain.
For your final stitch, push the needle through, but don’t pull the thread all the way through. Leave a small loop. Slide your needle and thread through that loop, pull it tight, creating a knot up against the last stitch, and you should be all set! From there, just trim off any extra thread on either end, and admire your handiwork.
Gear Repair #3: Backpack Shoulder Straps

Okay, here’s a big reason I wanted to learn to sew: my ULA CDT pack has taken me through the entire CDT as well as a bunch of overnights and day hikes. Some of the stitching is finally starting to fray. It’s looking a little sketchy on one of the shoulder straps, and I can see I’ll definitely be using the bigger needle for this repair.
1. Double Thread The Needle

Full disclosure: I actually did this slightly wrong the first time. (Experienced sewists say this is normal - don't worry!) What’s pictured is the correct way to do it. The idea here is that each time you pull the needle and thread through, you get double the thread and double the strength. So instead of threading your needle and allowing one end to be loose (it's called the "tail" of the thread), you knot both ends of the thread in a knot, so that you're essentially working with a loop of thread, causing double the thread to go into each stitch.
2. Complete the Same Simple Stitch

We are once again working from the inside of the backpack, holding our torn fabric together, just passing the needle and thread through and pulling it tight. I found it far too difficult to get the needle through my backpack’s reinforced seams. Instead of forcing it through, I kind of tried to do what my mom called a “whip stitch” along the length of the seam, reinforcing that thinner fabric where it was beginning to tear along the seam.
3. Realize You Stitched Part of Your Backpack To Your Shoulder Strap & Start Over
Whoops! My seam ripper did come in handy here, and again, I'm reassured this is part of the learning process. This probably compromised the reliability of my entire repair job, and was a little upsetting. So I backtracked a bit, and I think I did it better the second time. It's all about the journey!
4. Knot & Snip

After completing my necessary stitches to repair the shoulder strap, I finished with the same knot as the previous repair, leaving a small loop for myself, then pushing the needle through there. I actually did that twice, for safety, then trimmed off the excess thread. Then I turned the backpack right-side-out again to see the final result.
Conclusions: Learning To Sew in Quick and Simple!
My experience learning to sew was a couple sessions over about 24 hours total. My mom was the biggest help, of course, so if you have someone in your life who’s good at sewing and can offer you hands-on advice, I highly recommend enlisting them.
I can’t stress enough how attainable this is. My repairs may not be especially pretty. In fact, they’re about as simple and messy as they could be. Still, though, I think they have effectively repaired my gear! Take a few hours, mess around with a needle and thread, and you can easily end up exactly as skilled as me, if not twice as good. Your gear will truly become yours in the end.
Matthew Kok (they/them) is a writer based out of the unceded territories of the Áak’w Kwáan on Lingít Aaní, or Juneau, Alaska. They write poetry and nonfiction and can be found on Instagram @matt.kok.